mirror of
https://github.com/Dichgrem/Blog.git
synced 2025-12-16 13:32:00 -05:00
320 lines
9.7 KiB
Markdown
320 lines
9.7 KiB
Markdown
+++
|
||
title = "乱七八糟:Git使用简明手册"
|
||
date = 2023-12-15
|
||
|
||
[taxonomies]
|
||
tags = ["乱七八糟"]
|
||
+++
|
||
|
||
前言 Git,作为现代软件开发中不可或缺的版本控制工具,常常让初学者感到困惑。本文旨在介绍 Git 的全流程安装和基本使用,希望能够帮助新手更轻松地理解和掌握 Git 的基本概念和操作。
|
||
<!-- more -->
|
||
|
||
我们以Github为例子过一遍Git的安装/配置/连接和第一次提交.
|
||
|
||
## 1.安装Git
|
||
|
||
- Windows:官网下载[Git-download](https://git-scm.com/download/)或者使用Scoop/WinGet等等.
|
||
|
||
- Linux:Ubuntu:`sudo apt install git` / Arch:`sudo pacman -S git`
|
||
|
||
安装完成后可以在终端中检测版本:
|
||
|
||
```
|
||
❯ git -v
|
||
git version 2.51.2
|
||
```
|
||
|
||
## 2.创建密钥
|
||
|
||
在推送代码到Github的时候,我们需要进行认证,有密码认证和密钥认证两种方法,现在推荐使用密钥认证。
|
||
|
||
- 首先生成一对公私钥,这里的邮箱可以随意填写:
|
||
|
||
```bash
|
||
ssh-keygen -t rsa -b 4096 -C "your_email@example.com"
|
||
```
|
||
你会看到如下所示的提示,像我一样填写路径的时候就可以顺便给它改个名字,否则会使用默认名id_rsa:
|
||
|
||
```
|
||
❯ ssh-keygen -t rsa -b 4096 -C "your_email@example.com"
|
||
Generating public/private rsa key pair.
|
||
Enter file in which to save the key (/home/dich/.ssh/id_rsa): /home/dich/.ssh/Github
|
||
```
|
||
随后一直按回车即可.
|
||
|
||
- 生成的这对公私钥位于``~/.ssh/config``路径下,在Windows中就是``C盘/User/你的用户名``下,带.pub后缀的文件为公钥,不带.pub后缀的为私钥,打开公钥复制全部内容,然后将公钥添加到Github的``Settings-SSH and GPG keys``中。
|
||
|
||
> 当你添加完毕后就无法在Github的设置中再次查看它了,确保了安全性.
|
||
|
||
- 随后编辑 `~/.ssh/config` 文件,这个文件的作用是让Git知道主机对应的密钥,例如:
|
||
|
||
```bash
|
||
# GitHub
|
||
|
||
Host github
|
||
HostName github.com
|
||
User git
|
||
IdentityFile ~/.ssh/Github
|
||
|
||
# Gitee
|
||
|
||
Host gitee
|
||
HostName gitee.com
|
||
User git
|
||
IdentityFile ~/.ssh/Gitee
|
||
```
|
||
|
||
> 这边的IdentityFile是你的私钥位置,即为不带pub后缀的文件。如果你不想将私钥放在~/.ssh/下,可以查看我的另一篇[博客](https://blog.dich.bid/network-ssh/)
|
||
|
||
- 设置好上面这些后就可以测试连接到Github,如果成功则显示successfully.
|
||
|
||
```bash
|
||
❯ ssh -T git@github.com
|
||
|
||
Hi Dichgrem! You've successfully authenticated, but GitHub does not provide shell access.
|
||
```
|
||
|
||
## 3.配置Git
|
||
|
||
在正式连接到仓库前,我们还需要让Git知道我们的用户名和邮箱地址。
|
||
|
||
- 显示当前的Git配置
|
||
```bash
|
||
git config --list
|
||
```
|
||
|
||
- 设置提交代码时的用户信息,这里的name推荐和你的GitHub用户名一致,邮箱可以不为真实邮箱,比如``no-reply@github.com``
|
||
```bash
|
||
git config [--global] user.name "[name]"
|
||
git config [--global] user.email "[email address]"
|
||
```
|
||
|
||
> 注意!如果你填写了你的真实邮箱,同时这个仓库又是Public的,那么其他人可以看到你的邮箱!
|
||
|
||
- 配置默认主分支为Main
|
||
|
||
```bash
|
||
git config --global init.defaultBranch main
|
||
```
|
||
|
||
这里的设置是因为Git目前默认的主分支名为 master ,而 Github 默认分支名为 main ,这样可以保持一致。
|
||
|
||
## 4.创建仓库
|
||
|
||
配置完Git之后我们就可以连接到远程的仓库了。首先创建一个Git仓库,一般有两种方法:
|
||
|
||
- 方法一(推荐)在远程创建后下载到本地
|
||
|
||
我们在Github中的``repositories``下New一个仓库,然后在绿色的Code按钮中复制链接,克隆远端服务器上的仓库;
|
||
|
||
```
|
||
git clone git@github.com:Dichgrem/script.git
|
||
```
|
||
|
||
>如果你前面没有配置密钥,就会发现无法使用这个命令克隆仓库。那么什么时候使用HTTPS的克隆呢?比如其他人的仓库,你没有权限,又不想fork一份的情况下,就可以使用HTTPS.
|
||
|
||
- 方法二:在本地初始化之后连接到远程
|
||
|
||
创建一个新文件夹,然后在那个文件夹下运行以下命令:
|
||
|
||
```bash
|
||
git init --initial-branch=main
|
||
```
|
||
|
||
- 在Github上创建一个同名仓库,随后添加远程链接:
|
||
|
||
```bash
|
||
git remote add origin <remote_repository_url>
|
||
```
|
||
|
||
> 如果你运行``git remote -v``发现URL为HTTP格式则可以用下面的命令改为Git格式:
|
||
```bash
|
||
# 例如:git remote set-url origin git@github.com:Dichgrem/dichos.git
|
||
```
|
||
|
||
## 4.推送代码
|
||
|
||
- 添加
|
||
|
||
在Git仓库中新建或修改文件后,使用如下命令把它们添加到暂存区:
|
||
```bash
|
||
git add *
|
||
```
|
||
|
||
- 提交
|
||
|
||
随后使用如下命令提交改动:
|
||
```bash
|
||
git commit -m "代码提交信息"
|
||
# 例如:git commit -m "update:mycode"
|
||
```
|
||
现在,你的改动已经提交到了 **HEAD**,但是还没到你的远端仓库。
|
||
|
||
- 推送改动
|
||
|
||
执行如下命令以将这些改动提交到远端仓库,随后即可在GitHub上查看;
|
||
|
||
```bash
|
||
git push origin main
|
||
```
|
||
|
||
> 想学习更多Git操作,可以使用这个[Git练习网站](https://learngitbranching.js.org/?locale=zh_CN)
|
||
|
||
## 5.Commit规范
|
||
|
||
- 提交信息的基本格式,例如
|
||
|
||
```
|
||
feat:add_highlight
|
||
```
|
||
|
||
- 常见的 Commit 类型
|
||
|
||
```bash
|
||
- feat:新功能的添加
|
||
|
||
- fix:修复 Bug
|
||
|
||
- docs:文档相关的修改
|
||
|
||
- style:代码格式、排版等不影响代码逻辑的调整
|
||
|
||
- refactor:代码重构,不涉及新功能或 Bug 修复
|
||
|
||
- perf:性能优化
|
||
|
||
- test:添加或修改测试代码
|
||
|
||
- build:构建相关的变更,如依赖管理、构建脚本等
|
||
|
||
- ci:持续集成相关的修改
|
||
|
||
- chore:其他杂项维护,不涉及源代码或测试文件的修改
|
||
|
||
- revert:回滚到上一个版本的提交
|
||
```
|
||
|
||
## 6.Git原理
|
||
|
||
- 三棵树
|
||
|
||
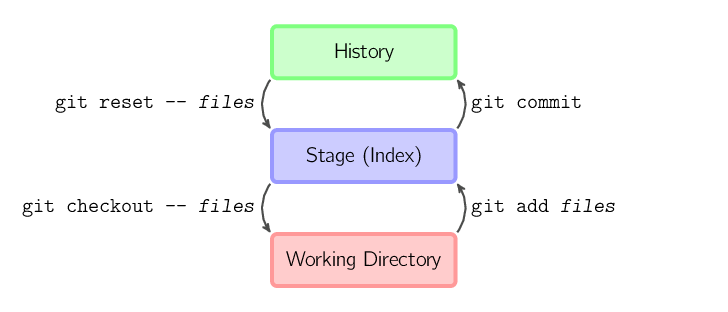
一个Git仓库的目录里面包括``工作目录``(即我们要追踪的代码)以及``.git``目录(Git 在这里存储自己的数据)。Git 维护了三棵“树”:第一个是你的 `工作目录`,它持有实际文件;第二个是 `暂存区(Index)`,它像个缓存区域,临时保存你的改动;最后是 `HEAD`,它指向你最后一次提交的结果。
|
||
|
||
|
||
|
||
- `.git` 目录结构
|
||
|
||
```bash
|
||
.git/
|
||
├── HEAD
|
||
├── config
|
||
├── description
|
||
├── hooks/
|
||
├── index
|
||
├── info/
|
||
│ └── exclude
|
||
├── logs/
|
||
│ ├── HEAD
|
||
│ └── refs/
|
||
├── objects/
|
||
│ ├── info/
|
||
│ └── pack/
|
||
├── refs/
|
||
│ ├── heads/
|
||
│ ├── remotes/
|
||
│ └── tags/
|
||
```
|
||
|
||
* objects:存储 Git 的所有对象,包括:
|
||
* blob:文件内容
|
||
* tree:目录结构
|
||
* commit:提交对象,记录提交信息和指向的树对象
|
||
* tag:标签对象
|
||
这些对象以 SHA-1 哈希命名,前两位作为子目录,其余作为文件名
|
||
* refs:存储所有引用,包括:
|
||
* heads:本地分支
|
||
* remotes:远程分支
|
||
* tags:标签
|
||
* HEAD:指向当前检出的分支或提交。例如,`ref: refs/heads/main` 表示当前位于 `main` 分支
|
||
* config:仓库级别的配置文件,包含用户名、邮箱、远程仓库等信息
|
||
* description:用于描述仓库,仅供 GitWeb 等工具使用
|
||
* hooks:存放 Git 钩子脚本的目录,可用于在特定操作前后执行自定义脚本,如 `pre-commit`、`post-merge` 等
|
||
* index:暂存区(staging area)的索引文件,记录了即将提交的文件信息
|
||
* info:包含辅助信息,如 `exclude` 文件用于定义仓库级别的忽略规则
|
||
* logs:记录了引用(如分支、标签)的更新历史,有助于追踪操作记录
|
||
|
||
---
|
||
|
||
## 7.Tips
|
||
|
||
|
||
### Verified
|
||
|
||
在 GitHub 的 commit 历史中看到的 “Verified” 标记,表示该提交是经过 签名验证(signed commit) 的,也就是 GitHub 能确认这个 commit 的确是由声明的提交者(你)签名并发布的。可以通过GPG或者SSH配置:
|
||
|
||
- GPG方式
|
||
|
||
```bash
|
||
sudo pacman -S gnupg //安装 GPG
|
||
gpg --full-generate-key //生成 GPG 密钥
|
||
gpg --list-secret-keys --keyid-format=long //查看你生成的密钥 ID
|
||
git config --global user.signingkey ABCDEF1234567890 //让 Git 使用该密钥签名
|
||
git config --global commit.gpgsign true //启用自动签名所有提交
|
||
gpg --armor --export ABCDEF1234567890 //导出公钥并添加到 GitHub
|
||
```
|
||
然后前往``GitHub → Settings → SSH and GPG keys → New GPG key``粘贴并保存。
|
||
|
||
- SSH方式
|
||
|
||
可以用你平时登录 GitHub 的同一个 SSH 密钥:
|
||
```bash
|
||
git config --global gpg.format ssh //让 Git 使用 SSH 格式签名
|
||
git config --global user.signingkey ~/.ssh/Github.pub //指定使用的 SSH 公钥
|
||
git config --global commit.gpgsign true //表示自动签名所有提交
|
||
```
|
||
然后前往``Settings → SSH and GPG keys → New SSH key → Signing key``粘贴并保存。
|
||
|
||
- 本地查看
|
||
|
||
首先创建这个文件:
|
||
```bash
|
||
mkdir -p ~/.ssh
|
||
nano ~/.ssh/allowed_signers
|
||
```
|
||
写入你的 ``test@mail.com ssh-ed25519 AAAABBBBBBBBBBBBBBBBxxxxxxxxxxxxxxxxxxxxxxxxxxxxxxxxxxxxxx``并保存。
|
||
随后配置Git信任该文件:
|
||
```bash
|
||
git config --global gpg.ssh.allowedSignersFile ~/.ssh/allowed_signers
|
||
```
|
||
随后使用``git log --show-signature``即可查看本地log中的
|
||
```bash
|
||
Good "git" signature for test@mail.com with ED25519 key SHA256:ssh-ed25519 AAAABBBBBBBBBBBBBBBBBBBBB
|
||
```
|
||
|
||
### 生成补丁
|
||
|
||
比如你修改了项目中的``fs/proc/base.c``,然后
|
||
|
||
```bash
|
||
git add fs/proc/base.c
|
||
git commit -m "fix:base"
|
||
git format-patch origin/16.0
|
||
```
|
||
即可在目录下生成补丁``0001-fix-base.patch``.
|
||
|
||
|
||
### 删除前一个提交记录
|
||
有时候手滑或者不想使用一个commit说明,可以用以下命令撤销上一个 commit:
|
||
```bash
|
||
git reset --soft HEAD~1
|
||
```
|
||
这个命令会撤销上一个 commit,但保留文件修改(代码仍然在工作区)。适用于 想要重新提交(amend)或调整 commit 的情况。
|
||
|
||
如果你想彻底删除更改(不保留代码修改),可以使用:
|
||
```bash
|
||
git reset --hard HEAD~1
|
||
```
|
||
|
||
---
|
||
**Done.**
|